Today's photo is ``Hasamu no Ie III,'' where the roof frame has been removed to expose the beams of the main house and lower house. Three hut beams are used for the main roof and two for the lower roof. The tops of these beams will be lowered to the existing girder tops + 105mm, and all beams will be reinforced. On top of that, I'm going to attach a beam support hardware to the belly of the beam, place a small beam of □105 on top of the girder, and make a horizontal rigid stage using thick plywood from above. Thermal insulation will be external roof insulation. There are many 9 to 12 shaku main roof materials that were obtained when the existing roof structure was dismantled, so we selected materials with minimal twisting and reused them for reinforcement and small beams.
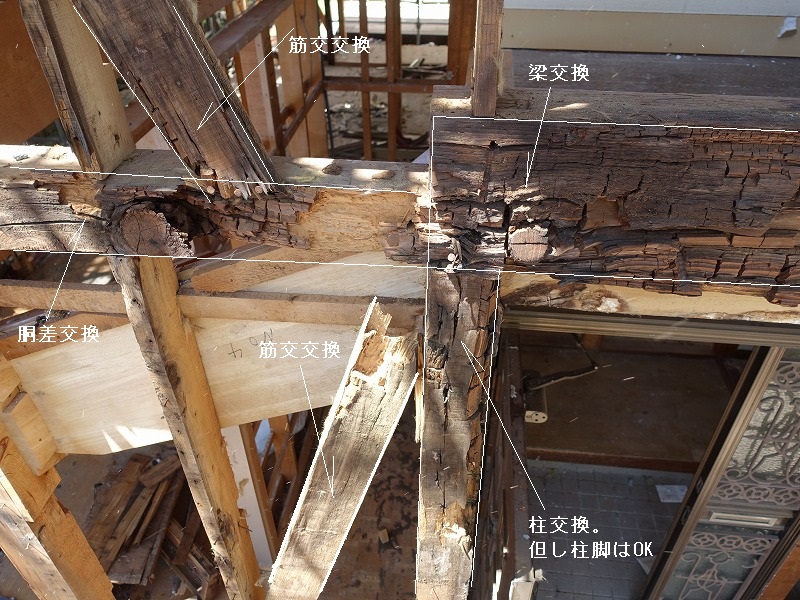
主屋の小屋梁3本。梁Cは捻じれが大きくクリープが心配なので新しい梁に架け替えます。
Three beams of the main house. Beam C is highly twisted and there is a concern about creep, so we will replace it with a new beam.
こちらが交換予定の梁C・・かなり寝ています。
This is the beam C that is scheduled to be replaced... it's pretty sleepy.
こちらが下屋の小屋梁2本。母屋は12尺のものもあるので再利用します。
These are the two shed beams of the lower house. Some of the main buildings are 12 shaku, so they will be reused.
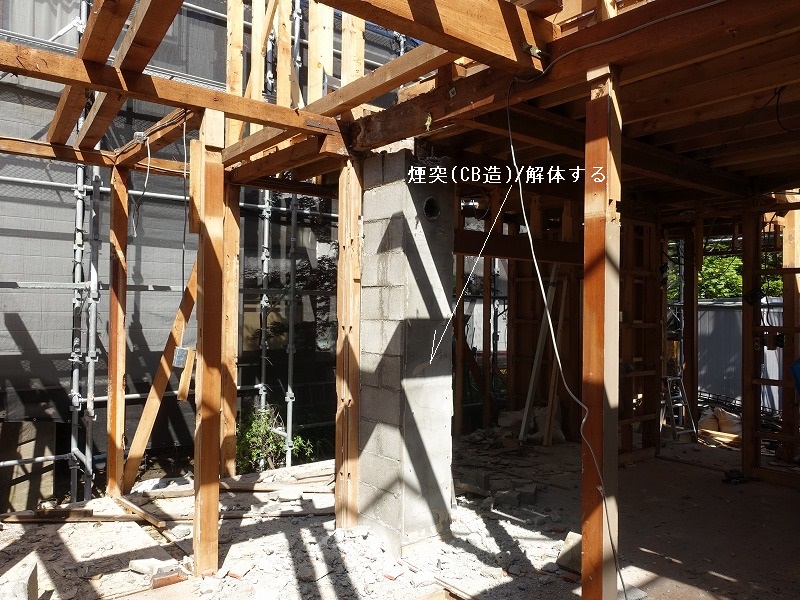
ブロックの煙突は解体します。
The block chimney will be demolished.
1階掃き出し窓の際柱。土台と共に交換です。
A pillar near the sweeping window on the first floor. It will be replaced along with the base.
久しぶりにバンアパなんていかがでしょう
How about having a bangpa party for the first time in a while?
This is the site of the performance-enhancing renovation work ``Hatsu no Ie III,'' where the external loose boards were also removed and the framework was exposed. There is one large structural damage on the east side and one on the south side. Particularly on the south side, not only the pillars but also some of the foundations will need to be replaced. Now that the damage is mostly clear, I would like to report the situation to the owner and discuss how to repair it. I'll digress from this point on... When performing renovations to improve the performance of a deep building, you should not be careless just because the exterior is clean, but open at least all the way around the building to check the foundation and trunk area. is. I tried to clean it from above without leaving any damage to the structure! Tempura construction work such as putting on insulation is not allowed.
On the east side, the girder above the entrance appears to be in severe pain. Cross-sectional loss of about 30% for both the trunk and beam. The capital of the column is also blurred and the surface can be turned over by hand to a depth of about 20mm from the column surface. The joints of the upper and lower braces had completely disappeared.
There was a window on the second floor above the sweeping window on the first floor, and water was leaking near that window. The water is damaging the girder and second floor beams. It appears that water leaked near the first-floor sweeping windows, and the pillar bases and foundations on both sides were damaged.
外部より見た掃き出し窓の左側の柱脚。土台が傷み柱がめり込んでいます。
The pedestal on the left side of the sweeping window seen from the outside. The foundation is damaged and the pillars are sunk in.
“Hatsu no Ie III” on Saturday, May 20th. Today I finished dismantling the exterior, so I went to check for damage to the structure. The results were...well, as expected, but I felt that the current construction methods were evolving. Now, the reason why it is important to dismantle the exterior and check for damage to the structural materials is that buildings from the era that did not have ventilation layers (drainage function) or moisture-proof layers suffered serious damage to the outside air side of columns and beams. Because it's easier to concentrate. To put it simply, the back side of the exterior (the outside air side of the pillar), where the temperature is most likely to drop among the walls, is the weakest point against condensation and leakage of rainwater. One thing to keep in mind is that you can't really tell from inside the room. Please join us for an inspection today.
The lesson learned from the photos is that even if the partial insulation renovation is minor, it is necessary to open the base approximately 45cm above the base and 45cm above and below the intermediate shell to inspect and repair damage to the structure. about it. Damage to traditional wooden structures tends to be concentrated in this area.
北側の柱(と)の(1)番。室内側からは何ら問題なく見えますが・・・
Number (1) of the pillar on the north side. It looks fine from the inside, but...
外から見ると要交換です。
From the outside, it looks like it needs to be replaced.
About 1/3 of the pillar on the left side of the window is rotten and gone. Is there condensation behind the mortar, water leaking from the edge of the sash, or both? Water collects between the sheathing board and the pillar, causing the pillar to rot from the outside.
こちらは同じ場所を室内から見たところ。シージングボードこそ傷んでいますが柱は無傷のように見えます。
This is the same place seen from inside. Although the sheathing board is damaged, the pillars appear to be intact.
The construction process for ``Hatsuno House III'', which had scaffolding on it, has been completely dismantled up to the ceiling on the second floor, making it possible to visually inspect everything up to the attic on the second floor. What impressed me was that the mortar base was different between the first and second floors. In 1981, when the first application for confirmation was submitted, the mortar base was horizontally pasted with 12mm loose boards. Eight years later, in 1989, when the second floor was added, sheathing boards, a load-bearing material, were used. At that time, there was still little awareness that it could replace braces, and it was used in conjunction with braces. This sheathing board was quite crooked...the nails that hold the lath in place stuck out on the indoor side, and the tips of the nails were condensing inside the wall, creating circular stains. The edges of the external aluminum sash also had water leakage or condensation, and the sheathing board was shaky. Wood that can withstand stains even if it gets a little wet within the rot limit, and new building materials that will fail if even a little water gets in.More than the product difference, the insulation structure and details that prevent moisture from getting into the walls are important tasks for designers. I felt it again.
こちらが二階のシージングボードを室内から見たところ。黒色の染みが一面に・・
This is a view of the sheathing board on the second floor from inside the room. Black stains all over...
The culprit was that the nails used to fasten the lath were exposed inside the room and condensation formed on the tips. Of course, the nails are rusty and red.
二階の外付けアルミサッシの端部は盛大に漏水痕がありました。窓は壁厚内に引っ込めるべきですね~・・・
There were large signs of water leakage at the edges of the external aluminum sash on the second floor. The windows should be recessed into the wall thickness...
In winter, the high-temperature, high-humidity indoor air warmed by the heater escapes into the ceiling and condenses on the back of the roof boards, which are cooled by the snow on the flat roof. The condensation marks are the result of this repetition. However, 12mm roof boards can be walked on the roof without rotting.
こちらが当時の新建材であるシージングボード。キャッチフレーズは「省エネで耐震だそうな・・」
This is sheathing board, a new building material at the time. The catchphrase is "Energy-saving and earthquake-resistant..."
On May 17th (Wednesday), the demolition of the walls and ceiling around the water area for "Hatsu no Ie III" has almost been completed, so we will check the extent of damage to the frame. It became clear how harsh the environment for wood was inside the walls without moisture-proof sheets. The bathroom is an early unit bath measuring 0.75 tsubo, and there are no problems with the foundation or pillar base. I love making baths, but I realized the importance of making a half-unit even if it's just below the waist. On the other hand, the outer wall of the changing room, which was used for indoor drying and water heater storage, was severely damaged, making me realize once again how dangerous it is to let moisture get inside the wall on a daily basis.
This is the outer wall of the living room, and the loose boards on the mortar base were blurry and crumbling from the humidity. It seems that many of the feathered materials at that time were green materials that were not sufficiently dried, and since the loose board just below was nothing, I realized once again the importance of lowering the moisture content during construction (using dry materials). Masu.
I was using a relatively new FF type exhaust top through the glasses stone at the time. The lifespan of a water heater is about 10 years, so I think this happened after replacing it several times. This spectacle stone is made of concrete, so there is no insulation. It turns out that condensation was condensing inside the walls and rotting the surrounding wood. Looking at this situation, it becomes clear that an airtight gasket is required for the part of the equipment pipe that penetrates the outside wall.
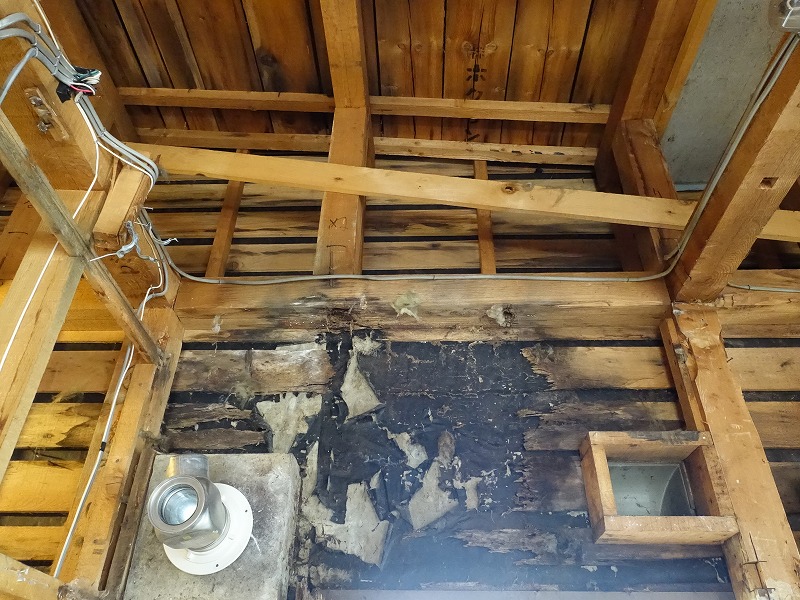
壁内の湿気によってモルタルの下地である12mmのバラ板が腐ってなくなっていました。
The 12mm loose boards that served as the base for the mortar had rotted and disappeared due to the moisture in the walls.
On May 15th (Monday), we looked up at the second-floor flooring and sorted out the problems with Hiei Construction at ``Hasamu House III.'' Generally speaking, Showa-era houses are not structurally strong from today's perspective. The reason has nothing to do with cutting corners, it's because it was the technical standard at the time. People often point to old work and criticize it from a current perspective, but they often miss the point because they don't fully understand the reality of the time. In fact, this time we had a sufficient amount of insulation for the walls and ceiling, and we also actively used hardware such as battledore bolts and beam support hardware. On the other hand, since it is a modification aimed at improving performance, the purpose is to raise the standard at the time to the current one. If we explore the current improvement points from that perspective...
Excessive load is placed on one beam. Since the pillars were not supported by the main beams, the structure was completed by adding beams underneath. The existing joists are in the way, making it impossible to pass the moisture-proof sheet through from the indoor side. I want to install plywood from the outside, but the width of the existing studs is too narrow... As you may have guessed, the second floor pillars are on top of the second floor floor beams, and the shed beams are on top of them. It has bundles & purlins & roof rafters on it. If the second-floor beams are removed too easily, the superstructure they support will also collapse, making removal itself difficult, and the main points of discussion regarding the structure are reinforcement methods and distortion correction. Of course, if we don't solve the structural system without contradicting the insulation and airtightness, we will be in trouble later, so we have to think about it with all our might.
Note: This time, the neighboring land is too close to use external insulation and moisture-proof sheets. So moisture proofing starts indoors...
Once again, I feel that with conventional construction methods, the floor plan ≒ structure. Additionally, the placement and distance between adjacent properties is especially important for later performance improvement renovations.
It looks like the 270mm beam was originally reinforced with □105 from below, but it is not really effective because they are not firmly connected to each other. Large beams with spans of 2.7m and 3.6m hang from the east and west. Actually, I would like to replace all the beams, but the second floor will fall down, so I will think about reinforcement methods.
手刻みの際に明らかに梁長さを短く誤ってしまった。その結果下の梁でなんとか構造的に成立させている。
When I carved it by hand, I obviously made a mistake in setting the beam length too short. As a result, we managed to make it structurally viable using the beams at the bottom.
The issue is how to resolve structural reinforcement and insulation without contradiction. There is not enough distance between adjacent properties, and external insulation and air sealing, which increases wall thickness on the adjacent property, can only be used to a limited extent.
This is ``Camp House III,'' where all the glass wool in the attic on the first floor has been removed, making it possible to look up at the entire floor structure on the second floor.
My job today is to create a floor plan for the second floor. My neck got tired from looking up, lol...I learned a lot.
From my current perspective... there are fewer beams and the beams are also smaller. (Ni-dori 5 to 8) The original beam size was 240, but the beam was reinforced with □105, and the girder (left: 270, right: 240) hangs from the left and right in 6 different ways, so it was worth reinforcing it.
Since it was originally a one-story house, the roof beams (currently the floor beams on the second floor) were set 105mm upwards from the trunk gap in order to provide sufficient ceiling height. As a result, the floor joists on the second floor will be placed on top of the girders with a spacing of 303 mm to match the top of the shed beam.
二階の床根太は既存の大梁の腹に根太受を打って落ちないように取り付けられていました。
The floor joists on the second floor were attached to the sides of the existing girders to prevent them from falling.
Adding a second floor to a one-story house naturally requires stairs. This is the outer wall part of the stairs. The columns are not supporting the beams. There is a beam with a beam length of 240mm, so it jumps in terms of span, but I didn't understand why. This part is needed as an additional load-bearing wall, so replace the column and connect it to the beam.
Today we started dismantling the interior of the first floor of ``Hatsu no Ie III''. The order of destruction is from top to bottom, that is, proceed from the ceiling. This house was a one-story building when it was completed in 1981, and until the second floor was added eight years later in 1989, the attic on the first floor was an attic...for that reason, when the ceiling was removed, it was completely filled with stuff. Glass wool (ceiling insulation for a one-story house) was exposed. For the ceiling, another layer of gypsum board was added on top of the original decorative gypsum board when the construction was completed, and the attic was connected to the underfloor to prevent rat droppings. If we just laid it down, air would run through the gaps in the veranda, and we visually confirmed that the glass wool would become black due to the moisture in the room, causing dusting and other problems.
竣工時の天井用化粧石膏ボードの上にもう一層石膏ボードを増し張りしてクロス張としていた。
On top of the decorative gypsum board for the ceiling at the time of completion, another layer of gypsum board was added to create a cross-covering.
This cut shows that insulation must be installed without any gaps in both walls and ceilings. The dust that looks black is actually a trace of humid air passing through. If air moves through the glass wool, insulation will not work.
The ceiling finish on the first floor has been removed. If you simply lay glass wool like a futon over the field edge, the humid air inside the room will run through the gap between the field edge and the glass wool, leaving a black mark called dusting. Even though the same ceiling is insulated, it is easy to understand why it has evolved into sparge insulation. Naturally, carpenters engaged in demolition are fully protected with dust masks, goggles, and gloves. At that time, glass wool was prickly and difficult to touch with bare hands.
Rat droppings were found in various parts of the building, indicating that the floor joist flooring, floors, and attic were continuous passageways for rats.
Construction began on May 11th (Thursday) for performance improvement renovations (long-term high-quality housing renovation promotion project) ``Cold House III'' (Hassam Noie III). The first application for confirmation was made in 1981 (New Earthquake Resistance), and the second application was made in 1989 for the purpose of adding a second floor from a one-story building. A 42-year-old wooden mortar two-story building will be completely renovated to improve its performance. Today is the first site meeting after Hiei Construction and the owner moved out. My job is to have the carpenter partially dismantle the floor and walls and check the actual situation. The reason is simple: confirmation drawings from this era are often unreliable, and non-destructive and visual inspection is the limit of investigation while the homeowner is present. The results of the inspection were that the exterior mortar was 20mm thick instead of the 30-35mm thickness that was common at the time, the underlying loose boards were 12mm thick instead of 18mm, and the interior board was 9mm thick, so the horizontal rim was constructed at @455, and the first floor joists are 45 x 105 (mm), so the pitch is @1820. We will take into account what we learned today and make corrections to the implementation drawings.
木造モルタル2階建て(元々は平屋)築42年をマルっと性能向上改修します。
The 42-year-old two-story wooden mortar building (originally a one-story building) has been completely renovated to improve its performance.
Looking up at the flat roof from inside. While roofs in Honshu slope toward the outside of the building, flat roofs in Hokkaido have the opposite slope. Surprisingly, the construction is similar, with @455 having □45 rafters compared to the main building @900, followed by 12mm roofing boards, roofing, and colored iron plates, in that order. What you'll see is the black condensation marks left by moisture escaping from inside the room and coming into contact with the roof boards, which have been cooled by the snow on the roof.
Evidence shows that the bathtub was an FE type (a type that uses indoor air for combustion) when it was first built. To prevent incomplete combustion of the bath kettle, we had to draw in outside air at below zero temperatures. It is easy to see why it evolved to the currently common FF type (in which outside air is introduced directly into the combustion section for combustion).
The glass wool on the indoor side is relatively clean. On the other hand, the outdoor side is black. The reason is simple...the vinyl cloth on the interior actually acts as a moisture-proof sheet and prevents moisture from entering the walls. Studs are 30 x 105 (mm) @455, braces are 45 x 90 (mm). The black waterproof paper (asphalt feld 17kg/m3) is visible through the gap between the 12mm loose boards on the mortar base.
This is the outdoor side of the glass wool, which was so clean indoors with no humidity. From the indoor side: glass wool, loose board 12mm, waterproof paper 17kg/m3, lath mortar 20mm
This is the middle partition. At that time, the mainstream interior board was a thin 9mm, so the horizontal rim 18 x 45 (mm) @ 455 was standard for reinforcement. What is surprising is that the markings on the pillars and studs were done on-site. Each one is dug out with a saw and chisel. Nowadays, this job is all pre-cut router processing. A young carpenter who only builds new buildings can't do it (lol)
Open the tatami floor and check the structure of the floor. Under the tatami mats, there was a control panel (lauan plywood) rather than a wooden board.
100mm glass wool made 40 years ago (the joist height is 105mm) which is dangerous to touch with bare hands. Trical net between the joists to prevent falls.
Opening the tatami floor. Even if the glass wool is 100mm thick, exposing raw glass wool directly to the cold air under the floor will not work very well. If the floor is covered with a breathable tarpaulin sheet instead of Trical Net, the floor insulation will be effective. I can only say this now...
Under the floor without a moisture-proof sheet. There is also a slight musty smell. The forked tube visible under the trical net is a kerosene oil line (copper pipe). Moisture-proofing and insulating the subfloor surface will double the capacity...